
AiM Sport
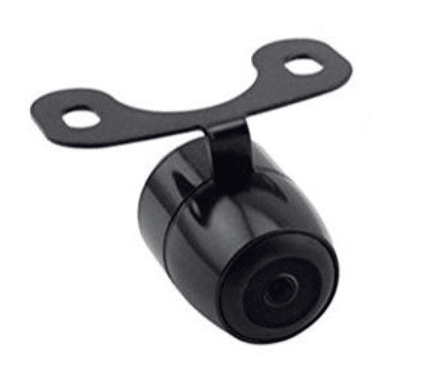
AiM Mirror/Reversing Camera For MX 1.2 Series
SKU:00341
Couldn't load pickup availability
- Fast Dispatch and Shipping
- Support when you need it
- Secure payment and tracked shipping
- Trustpilot TrustScore 4.8/5 (222 reviews)
Need Help?
Need Help?
You can contact us via our chat box on our website, phone or email.
Aaron Harris: +64 27 449 9654 & aaron@harriscomms.co.nz
Rex Harris: +64 21 682 912 & rex@raceradios.co.nz
Shipping & Delivery
Shipping & Delivery
New Zealand:
- Nationwide delivery for just $14 NZD ($19 for helmets).
- Delivered by NZ Couriers or Post Haste.
- Delivery Time: 1-7 days (avg. of 1.3).
- Free Local Pickup is also available from 15 Michael Road, Paraparaumu 5032.
Australia:
- Standard shipping costs $36.95 AUD ($49.95 for helmets).
- Delivered by Asendia, DHL Express or FedEx.
- Delivery Time: 7 - 14 days (avg. of 7.8).
- For large items we may need to contact you if the freight is higher than expected.
Secure Payment Methods
Secure Payment Methods
We accept Apple & Google Pay, Debit or Credit Cards, and PayPal for easy and secure transactions.
Exclusively for our New Zealand customers, we offer Afterpay and Bank Transfer.
Import Duties & Taxes
Import Duties & Taxes
Please note that your country may charge import duties, taxes and fees that you may have to pay ahead of delivery. If you have any questions regarding this, please get in touch.
The Video In connector allows the connection of two different analog cameras, that may be activated as here down described.
This camera offers a couple of interesting options: • the possibility to reverse the image • the possibility to enable or disable the parking overlay view.Compatible with: MXS 1.2, MXP, MXG 1.2, MXS 1.2 Strada, MXP Strada, MXG 1.2 Strada
Single Rearmaster camera (cable length: 5 m) ended with: o Male metallic 5pins Binder connector for connection to AiM loggers; o DC Power Connector (yellow) to be connected to the camera one; o Video RCA Connector (red) to be connected to the camera one. • Double RearMaster camera (cable length: 6 m) ended with: o Male metallic 5pins Binder connector for connection to AiM loggers; o X2 DC Power Connector (yellow)* to be connected to the camera one; o X2 Video RCA Connector (red)* to be connected to the camera one. * The two DC Power and Video RCA cables couples are respectively 4m and 6m long, in order to allow both front camera and rear camera connection.Physical Connection
The Aim loggers built to manage rear cameras are provided with a female metallic 5 pins Binder connector, placed on the device bottom and labelled as “VIDEO IN” (following image).


The Video In connector allows the connection of two different analog cameras, that may be activated as here down described.
-
This camera offers a couple of interesting options: the possibility to reverse the image.
- The possibility to enable or disable the parking overlay view
It has, as most of the analog cameras, a connection through standard RCA connectors (following right image), for which we have developed the patch cables:

Single Rear Camera (cable length: 5 m) ended with:
- Male metallic 5 pins Binder connector for connection to Aim loggers
- DC Power Connector (yellow) to be connected to the camera one;
- Video RCA Connector (red) to be connected to the camera one.

Double Rear Master camera (cable length: 6 m) ended with
-
Male metallic 5-pin binder connector for connection to AiM loggers
- X2 DC Power Connector (yellow)* to be connected to the camera one
- X2 Video RCA Connector (red)* to be connected to the camera one.
* The two DC Power and Video RCA cables couples are respectively 4m and 6m long, in order to allow both front camera and rear camera connection
Aim offers the same camera with a more reliable Binder connection (Part no. XB1ZCAMHD00; Binder connector pinouts are specified below):


The patch cables available are:
Single Aim Mirror Camera (6m length) ended with
-
Male metallic 5-pin binder connector for connection to AiM loggers
Female metallic 5-pin binder connector for mirror camera connection.

Double Aim Mirror Camera: ended with:
-
Male metallic 5-pin binder connector for connection to AiM loggers
- X2 female metallic Binder connectors: each one must be used to connect the Mirror Camera (cable lengths 4m – front camera – and 6m – rear camera).

Configuration Through Race Studio 3
Once the connection has been executed, it is necessary to configure the device, defining a specific event that causes the camera image displaying. For example, if you wish to turn ON the camera when you insert the Reverse Gear, these are the steps to follow:
- Open Race Studio 3, connect your system via Wi-Fi or USB and create a new configuration (or modify an existing one).
- The Gear, of course, is supposed to be one of the available channels. It is possible to obtain it
Through analog sensor, plugging it into one of the device analog channels, which must be configured as expressed on the right (Channels tab). The “Use reverse gear” box must be ticked.

Through ECU, selecting the compatible protocol with your vehicle ECU from the ECU Stream tab.

Open the Trigger Commands tab and click “Add New Command”: select “First Camera Input Page” as a command to activate when the Gear is equal to “R”.

Settings Through Aim Device Menu
The camera parameters setting must be executed from the device menu directly, as explained below:
- Press “MENU/<<” button. Pressing 'PREV' and 'NEXT', move to the VIDEO IN icon and press 'ENTER'.
- The system offers the possibility to set the image format (PAL or NTSC – according to the camera technical specs), brightness and contrast for each available input.