How to Fit a Helmet
Tegan Harris
HOW TO FIT A HELMET No single helmet can offer complete protection against all potential impacts. To ensure optimal safety, it is essential that the helmet fits correctly, with the chin strap securely fastened, and allows for adequate peripheral vision.
Step 1 – Head Measurement
The initial step in the sizing process involves measuring the head. While using a tape measure, it’s important to note that heads of seemingly identical sizes may not necessarily require the same helmet size due to varying shapes. Measure the circumference of the head approximately one inch above the eyebrows at the front and at the point on the back of the head that yields the largest measurement possible. Take multiple measurements to ensure accuracy and select the largest one obtained.
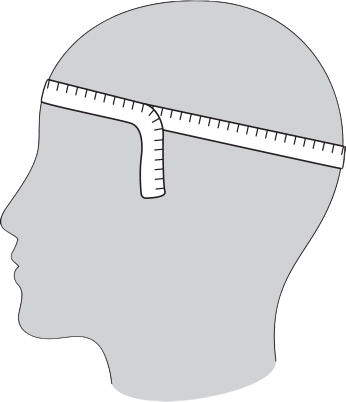
Illustration 1
Step 2 – Positioning Your Helmet
Once you have determined the measurement, select the helmet that is closest in size to the tape measurement and try on the helmet. If it is between sizes, round up to the next largest one. If you use a balaclava or head sock, always measure and fit the helmet with it on.TRY ON
- Grasp the helmet by the chin straps, with the front of the helmet towards you and the top of the helmet facing down.
- Place the thumbs on the inside surface of the straps and balance the helmet with the index fingers.
- Spread the helmet apart with the hands and slip down over the head.
See Illustration 2.
If the helmet easily slides down on the head without resistance, it may be an initial indication that it is too large. Conversely, if it doesn't slide down over the head at all, it is likely too small. Some individuals who haven't worn helmets before might hesitate to pull down if they encounter resistance during helmet fitting. However, if it fits snugly while putting it on, it is advised to continue pulling it down. Only when the helmet is impossible to put on should you consider moving to the next size, as helmets that fit snugly generally provide an excellent fit once worn properly. In fact, most people tend to choose a helmet that is too large for them when left to their own judgement. Keep in mind that padding often adjusts and becomes more comfortable after extended use, so a snug fitting helmet is recommended. Helmets that are too large may not function as intended and, in severe cases, could come off during an accident.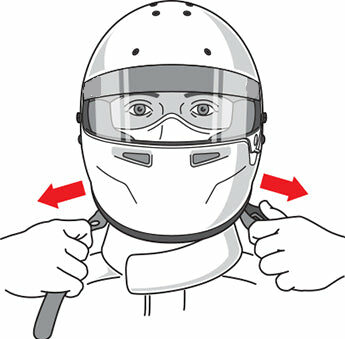
Illustration 2
Step 3 – Correct Helmet Fitting
To achieve a proper fit, the helmet should be positioned as follows:
-
The helmet should sit low on the brow, with the eyes near the centre of the eye-opening.
- It should make contact with the top of the head, applying uniform and firm pressure all around.
- The fit should be snug without causing excessive pressure points. Refer to Illustration 3 for visual reference.
When worn correctly, the helmet should provide a secure and comfortable fit, ensuring adequate protection.
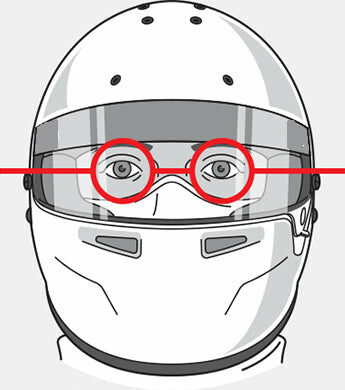
Illustration 3
To securely fasten the chin strap, follow these steps:
- Thread the end of the strap through both d-rings located on the side of the helmet.
- Loop the strap end back through the inner d-ring.
- Pull the strap comfortably tight against the throat, ensuring a snug fit. Refer to Illustration 4 for visual guidance.
It is crucial to have the chin strap properly fastened and snug against the throat to enhance helmet stability and security during use.
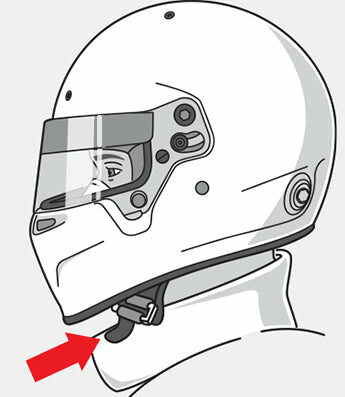
Illustration 4
PROPER USAGE OF THE CHIN STRAP
For maximum safety during an accident, a properly fitted helmet with a securely fastened chin strap is crucial. It’s essential to double-check that the chin strap is fastened correctly and snugly against your throat every time you wear your helmet.
To correctly fasten the chin strap:
- Buckle the chin strap as demonstrated in Illustration 5.
- Adjust the side strap until the chin strap is snugly and securely against your throat.
Maintaining a properly fastened chin strap ensures the helmet’s stability and enhances its effectiveness in providing protection. Remember to adhere to these guidelines for each and every helmet use.
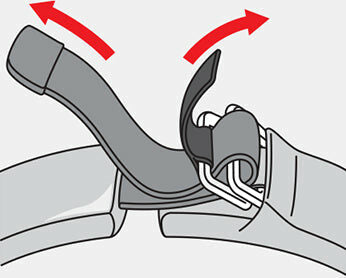
Illustration 5
Step 4 – Verifying the Fit
Follow these steps to check the fit of your helmet:
- Position the helmet correctly on your head and stand in front of a mirror.
- Check for any horizontal or vertical movement of the helmet.
- Verify if the cheek pads are in contact with your cheeks. Ensure they are not exerting excessive pressure or too loose.
- Look for any gaps between the temples and the fit pad.
- Examine the back of the helmet where the neck roll (if applicable) comes into contact with your neck. Ensure it makes contact without pushing the helmet forward, causing it to cover your eyes.
- After the visual check, hold the helmet with both hands—one on each side—and gently rotate it from left to right and then from front to back, as shown in Illustration 6 and 7. If the skin on your brow moves with the helmet’s rotation, the fit is proper. If the skin remains stationary or if you can pull the helmet down over your eyes, it indicates a loose fit.
Pay attention to how the helmet fits in the cheek area. If the padding excessively squeezes your cheeks, it is too tight. If the cheek pads do not make contact with your skin or if you can easily rock the helmet from side to side, it is too loose. Bell Racing offers cheek pad inserts and accessory face piece kits with different cheek pad thicknesses to adjust the fit for drivers with specific needs.
How to Fit a Helmet – Retention Check
With the helmet properly positioned, and the chin strap securely fastened, attempt to remove the helmet from your head. Grasp it firmly and make a genuine effort to roll it off your head both forward and backward, as shown in Illustration 7. If you are able to remove the helmet or roll it far enough to expose your forehead or obstruct your vision, it indicates that the helmet is either too loose or the straps are not adjusted properly.If the helmet is too large or can be removed easily, DO NOT use it and replace it with a smaller size for optimal safety and protection.
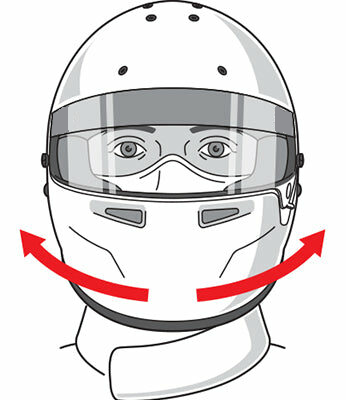
Illustration 6
If the helmet is too large, please repeat steps 1 through 4 as mentioned earlier.
If you are unable to remove the helmet, and it does not roll far enough backward to expose your forehead or forward to obstruct your vision, then you have a proper fit. Please note that we recommend fitting the helmet with a head sock or balaclava if you plan to wear one during competition.
REMOVING THE HELMET
To remove your helmet, follow these steps:
- Unfasten the chin strap by pulling the red “D” ring tab outward (away from your face) to release the strap tension, as shown in Illustration 5.
- Grasp the chin strap halves in each hand and while pulling outward, lift the helmet from your head, as shown in Illustration 2. Pull outward and lift it from your head.
Pressure Point Check
After removing the helmet, unfasten the chin strap. Take a moment to observe the coloration of your forehead and cheeks. If you notice any reddening of the skin in a specific area, it may indicate a pressure point. Pressure points sometimes go unnoticed by the wearer for several minutes or even hours. They can lead to discomfort or even headaches. If you identify a pressure point but cannot recall experiencing discomfort while wearing the helmet, put the helmet back on for a few minutes while paying close attention to the suspected pressure point. If you consistently experience discomfort in that area, go for the next larger size and repeat steps 2 through 4 to ensure a proper fit.
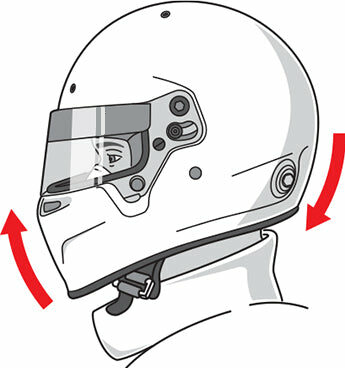
Illustration 7
STEP 5 – TEST DRIVE
Follow steps 1 through 4 diligently as they are crucial in ensuring your helmet provides optimal performance. Take the time needed to achieve a good fit that satisfies you. After successfully completing steps 1 through 4, put on the helmet and wear it for an extended period or during a test drive. If the helmet feels comfortable, remains firmly in place, and the straps are properly adjusted, it is ready to use. However, if the helmet feels uncomfortable or moves excessively, revisit steps 1 through 4 to address the issue. If you are unable to complete all 4 steps successfully or if the helmet doesn’t fit comfortably, DO NOT continue to use it. Instead, consider returning to the dealer for assistance or reach out to us at Harris Race Radios for further instructions.
Do not use chin cups, wear the strap on the point of the chin or modify the chin strap in any way. This will increase the risk of the helmet coming off in an accident.
